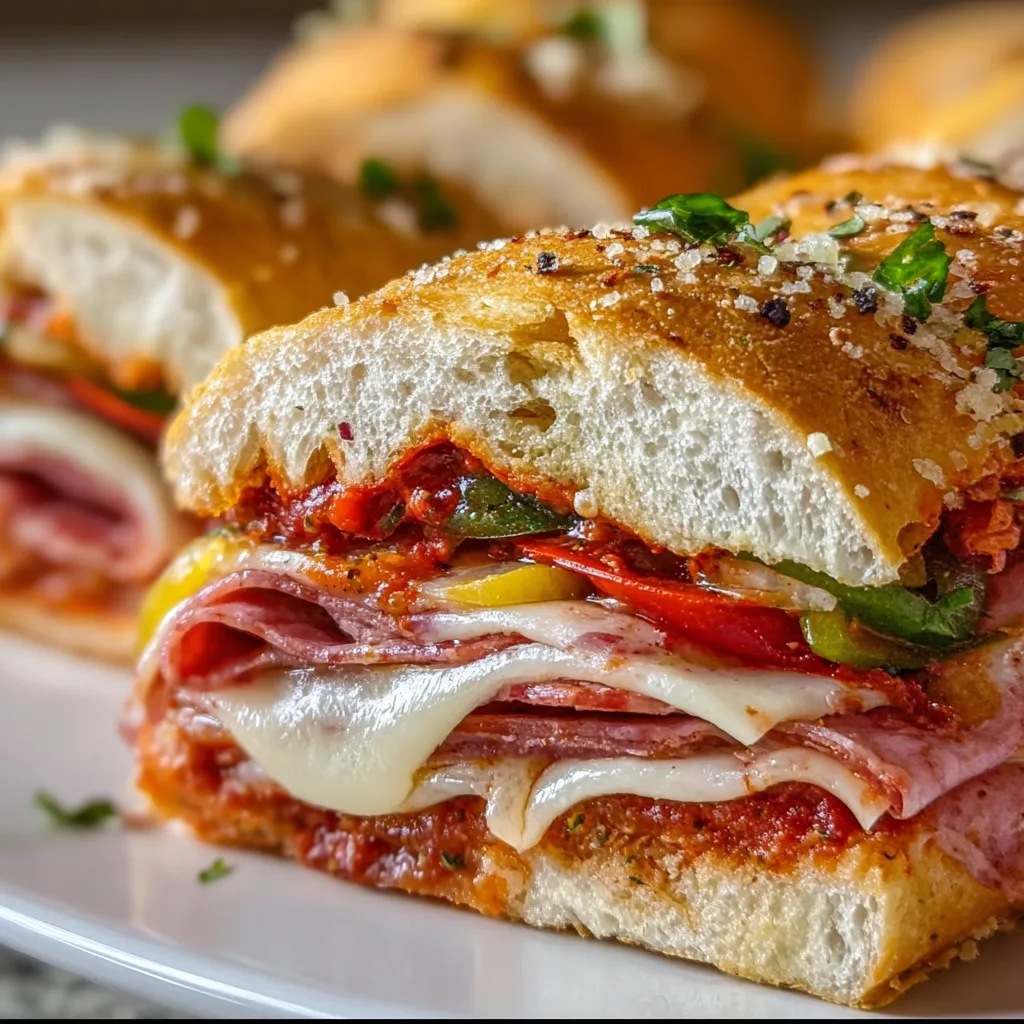
Baked Italian Grinder Sandwiches transform ordinary hoagies into a melty, toasty masterpiece that’s perfect for feeding a crowd. The first time I made these for my family game night, they disappeared faster than I could say “mangia!” There’s something magical about how the oven brings all those Italian meats, cheeses, and tangy vinaigrette together. The bread gets perfectly crisp on the outside while staying tender inside, creating that satisfying crunch when you bite into layers of savory goodness. If you love Hot Honey Chicken Cutlets but crave something with Italian flair, these grinders will absolutely hit the spot.
Table of Contents
Recipe
Print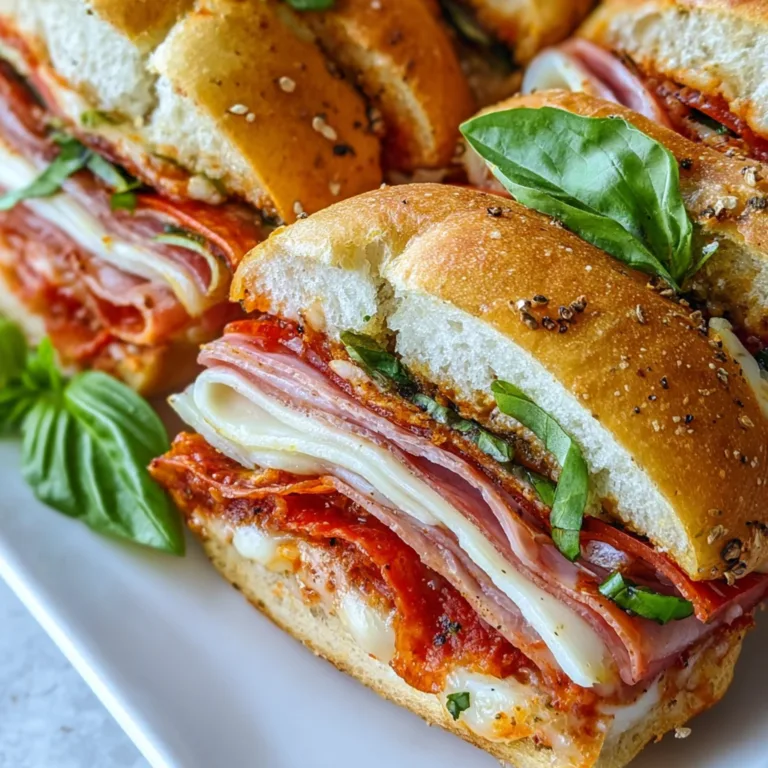
Delicious Baked Italian Grinder Sandwiches Recipe
These Delicious Baked Italian Grinder Sandwiches are loaded with layers of savory deli meats, melty cheese, and zesty toppings, all baked to perfection in a crispy, golden sub roll. An easy and flavorful meal perfect for lunch or dinner.
- Total Time: 30 minutes
- Yield: 4 sandwiches 1x
Ingredients
For the Sandwiches:
4 sub rolls or hoagie buns
200g deli ham
150g salami
150g pepperoni
200g sliced mozzarella or provolone cheese
1/4 cup butter, melted
2 cloves garlic, minced
1 teaspoon Italian seasoning
For the Grinder Salad:
1 cup shredded lettuce
1/4 cup sliced red onion
1/4 cup sliced banana peppers
1/4 cup mayonnaise
1 tablespoon red wine vinegar
Salt and black pepper to taste
Optional:
Tomato slices
Parmesan cheese for topping
Instructions
1. Preheat oven to 180°C (350°F).
2. Slice sub rolls open and layer with ham, salami, pepperoni, and cheese.
3. Place sandwiches on a baking tray.
4. Mix melted butter, garlic, and Italian seasoning, then brush over the tops.
5. Bake for 10–15 minutes until cheese is melted and bread is golden.
6. In a bowl, mix lettuce, onion, banana peppers, mayo, vinegar, salt, and pepper.
7. Remove sandwiches from oven and top with grinder salad and optional tomatoes.
8. Sprinkle with Parmesan if desired.
9. Close sandwiches, slice, and serve.
Notes
Add turkey or roast beef for variation.
Serve salad separately to keep bread crisp.
Use toasted rolls for extra crunch.
Best served warm.
- Prep Time: 15 minutes
- Cook Time: 15 minutes
- Category: Lunch
- Method: Baking
- Cuisine: Italian-American
Nutrition
- Serving Size: 1 sandwich
- Calories: 580
- Sugar: 5 g
- Sodium: 920 mg
- Fat: 32 g
- Saturated Fat: 14 g
- Unsaturated Fat: 16 g
- Trans Fat: 0 g
- Carbohydrates: 40 g
- Fiber: 2 g
- Protein: 28 g
- Cholesterol: 95 mg
Keywords: italian grinder sandwich, baked subs recipe, deli sandwich recipe, easy lunch idea, hot italian sandwich
Why You’ll Love These Baked Italian Grinder Sandwiches
Perfect Make-Ahead Party Food
These sandwiches are a meal prep dream – you can assemble them hours before your guests arrive, then just pop them in the oven when it’s time to eat. I love how the flavors meld together as they sit, creating an even more delicious result. The combination of genoa salami, pepperoni, ham, and provolone creates that authentic Italian deli taste that transports you straight to a neighborhood sandwich shop in Little Italy. Plus, they’re substantial enough to satisfy hungry appetites while being easy to slice into smaller portions for lighter eaters or appetizers.
Customizable For Every Taste
What makes these grinders truly special is how endlessly adaptable they are to suit anyone’s preferences. My husband loves extra pepperoncini for heat, while my daughter prefers extra cheese and less meat. The beauty is in creating your perfect balance. Try swapping provolone for mozzarella, adding roasted red peppers, or incorporating fresh basil leaves for a summery twist. You can even make vegetarian versions with grilled vegetables and extra cheese. The homemade Italian vinaigrette adds that signature tangy flavor that ties everything together, but you can adjust the herbs and spices to match your family’s taste.
Essential Tips & Tricks
Bread Selection Makes All The Difference
Choosing the right bread is crucial for Italian grinder success. Look for sturdy hoagie or submarine rolls with a slightly crusty exterior and soft interior. They should be substantial enough to hold up to the fillings without becoming soggy. I’ve found that bakery-fresh bread makes a noticeable difference in the final result. Before assembling, I like to lightly hollow out some of the interior bread to create more room for fillings and prevent overflow. This also improves the meat-to-bread ratio, ensuring every bite has the perfect balance of flavors and textures.
The Secret Is In The Layering
Strategic layering transforms good grinders into great ones. Start by brushing both sides of the bread with vinaigrette, which acts as a flavor-packed moisture barrier. Layer cheese first against the bread, then alternate meats and toppings, finishing with another layer of cheese. This cheese-meat-cheese structure creates a delicious seal that keeps fillings in place and prevents the bread from becoming soggy. For extra flavor, try adding a thin spread of Roasted Red Pepper Hummus to the bottom layer – it adds incredible depth that complements the Italian ingredients beautifully.
Serving Ideas & Creative Variations
Perfect Pairings For A Complete Meal
These Baked Italian Grinder Sandwiches shine when paired with the right sides. My family’s favorite combination includes a crisp Italian chopped salad with chickpeas and a light vinaigrette that echoes the sandwich flavors. For a heartier meal, serve alongside a cup of minestrone soup or roasted vegetable antipasto. In summer, I love pairing them with a chilled pasta salad with fresh vegetables and herbs. For dessert, something light and citrusy provides the perfect contrast – lemon sorbet or a small plate of Raspberry Almond Puff Pastry bites balance the savory richness beautifully.
Regional Italian Variations
Take your grinders on a tour of Italy by creating regional variations that showcase different Italian flavors. For a Tuscan twist, incorporate sliced porchetta, pecorino cheese, and arugula with a drizzle of truffle honey. A Sicilian version might include spicy soppressata, caponata spread, and aged provolone. For northern Italian inspiration, try prosciutto, fontina cheese, and a light layer of mushroom pâté. My personal favorite is a Calabrian adaptation with spicy ‘nduja spread, mortadella, and stracciatella cheese. These variations keep the basic technique the same while allowing you to explore Italy’s diverse culinary landscape.
Storage & Troubleshooting Guide
Make-Ahead and Leftover Solutions
These sandwiches are surprisingly versatile for storage and reheating. For make-ahead preparation, assemble completely but don’t bake – wrap tightly in foil and refrigerate for up to 24 hours. When ready to serve, bake directly from the refrigerator, adding about 5 minutes to the cooking time. For leftovers, store in an airtight container for up to 3 days. The best reheating method is in a 325°F oven for 10-15 minutes until warmed through – this restores the crispy exterior better than a microwave. For picnics or lunch boxes, try baking individual portions and wrapping them separately for grab-and-go convenience.
Preventing Common Pitfalls
The biggest challenge with Baked Italian Grinder Sandwiches is managing moisture balance. If your sandwiches turn out soggy, try these fixes: toast the bread lightly before assembly, pat wet ingredients like tomatoes or pepperoncini completely dry, and let cold ingredients reach room temperature before assembly. If your sandwiches are too dry, add more vinaigrette or a thin layer of mayonnaise to both sides of bread. For uneven melting, cover with foil for the first part of baking, then uncover for the last few minutes to achieve that perfect golden top. Finally, let the sandwiches rest 5 minutes before cutting for cleaner slices.
Frequently Asked Questions
Can I make Baked Italian Grinder Sandwiches vegetarian?
Absolutely! Substitute the meats with grilled vegetables, portobello mushrooms, or plant-based Italian “meats.” Layer with extra cheese varieties and add olive tapenade for savory depth.
What’s the best cheese for authentic Italian grinders?
Provolone is traditional, but a combination of provolone and mozzarella creates the perfect melt. For extra flavor, add a sprinkle of Parmesan or pecorino Romano.
How do I prevent my Baked Italian Grinder Sandwiches from getting soggy?
Toast the bread lightly first, use cheese as a barrier between bread and wet ingredients, and hollow out some bread from the center to improve the filling-to-bread ratio.
Can these sandwiches be frozen?
Yes! Assemble unbaked sandwiches, wrap individually in plastic wrap then foil, and freeze for up to 1 month. Thaw in refrigerator overnight before baking.
What’s the difference between a grinder and a regular sandwich?
Grinders are typically hot sandwiches on long rolls with substantial fillings. The name comes from the effort needed to “grind” through the crusty bread and hearty ingredients.
Final Thoughts
These Baked Italian Grinder Sandwiches have become my go-to solution for everything from game day gatherings to casual family dinners. There’s something deeply satisfying about pulling a tray of golden, bubbling sandwiches from the oven, hearing that crackle as the knife slices through the crispy exterior, and watching the cheese stretch into perfect, Instagram-worthy pulls. The versatility, make-ahead convenience, and crowd-pleasing flavors make this recipe one I return to again and again. Find more inspiration for your next gathering on my Pinterest boards where I’m always sharing new sandwich ideas!